

Easter Eggs


How to Dye Eggs
The supplies and ingredients that you will need are pretty basic. Choose your food stuff or plant material, depending on the colors you want to achieve. A quick Pinterest search will give you lots of ideas, but you could use:
Onion Skins (red and yellow)
Avocado Pits and Skins
Turmeric
Beets
Red Cabbage
Tea
Coffee
Black Beans
and many, many more options as well
You will also need a pot to cook the dye material, and jars or bowls in which to let the eggs steep. You may also need vinegar.
(just as an aside, dyeing fabric is a similar process, but there are more steps to prepare the fabric and ensure that the color will last. I will cover some of these in a future blog post.)
Process for Egg Dyeing
Chop your dye materials roughly and cover with water in a non-reactive pot.

Simmer for 1-2 hours depending on the strength of the dye that you would like to achieve. Be careful not to boil, as some colors can be effected by boiling.
Strain the liquid out of the dye material and compost the solids. The next step is up to you, but I have the most luck with gently placing the eggs in the hot dye, and leaving the heat on low for approx. an hour.
You can either put the raw egg in the pot and let it hard boil, though I don't suggest eating them later, as they may be soaking for days. Or, you can blow out your eggs and just dye the shell.
Note: some dyes, like Black Bean, are simply soaked overnight without heat. You can then check the color of your eggs and decide if you want to leave them in the pot for a longer time. I loved the look of the white eggs left in the red cabbage dye pot for 2-3 days after it cooled.

These eggs were dyed with yellow onion skins on white eggs

White eggs dyed with approx. 1/2 cup of Turmeric and White and Brown eggs dyed with yellow onion skins.
Decorating your Naturally Dyed Easter Eggs
There are endless possibilities for how to further decorate your eggs, once they are dyed. I am a big fan of working with what you have to make decorations for holidays, so rather than run out to my local craft store for more supplies, I decided to just use a chalk pen and a fine point Sharpie, that I happened to have on hand.

For the blue eggs I wanted to show off the color as much as possible, so I decided on simple illustrations of botanicals on one side of the egg only. I am really pleased with how these turned out.

The red cabbage dye on the brown eggs came out a bit of a muddy grey with hints of blue. On these, I used a chalk pen and covered more of the eggs, as I did not want to highlight the color as much. The blue actually shows through the chalk pen drawings, so that they are a soft blue/white.

I loved how the yellow eggs turnout, with a painterly like mottled surface, making the perfect backdrop for a more complicated pattern. I found this pattern on a photo of Russian Easter Eggs (via Pinterest), which is a beautiful Pussy Willow pattern with a frame of decorative dots. It was the perfect motif to create with both the Sharpie and the chalk pen.

For the brown eggs, I decided to use Scandinavian inspired motifs, created with the chalk pen. These bold patterns worked really well with the deep color of the eggs.
A word of advice: use a soft touch when drawing on the eggs, even with the soft tip of the chalk pen, I managed to puncture the shells of a couple of eggs.
How will you dye your eggs?
I'd love to see what colors you make with your Easter Eggs and how/if you decide to decorate them further!
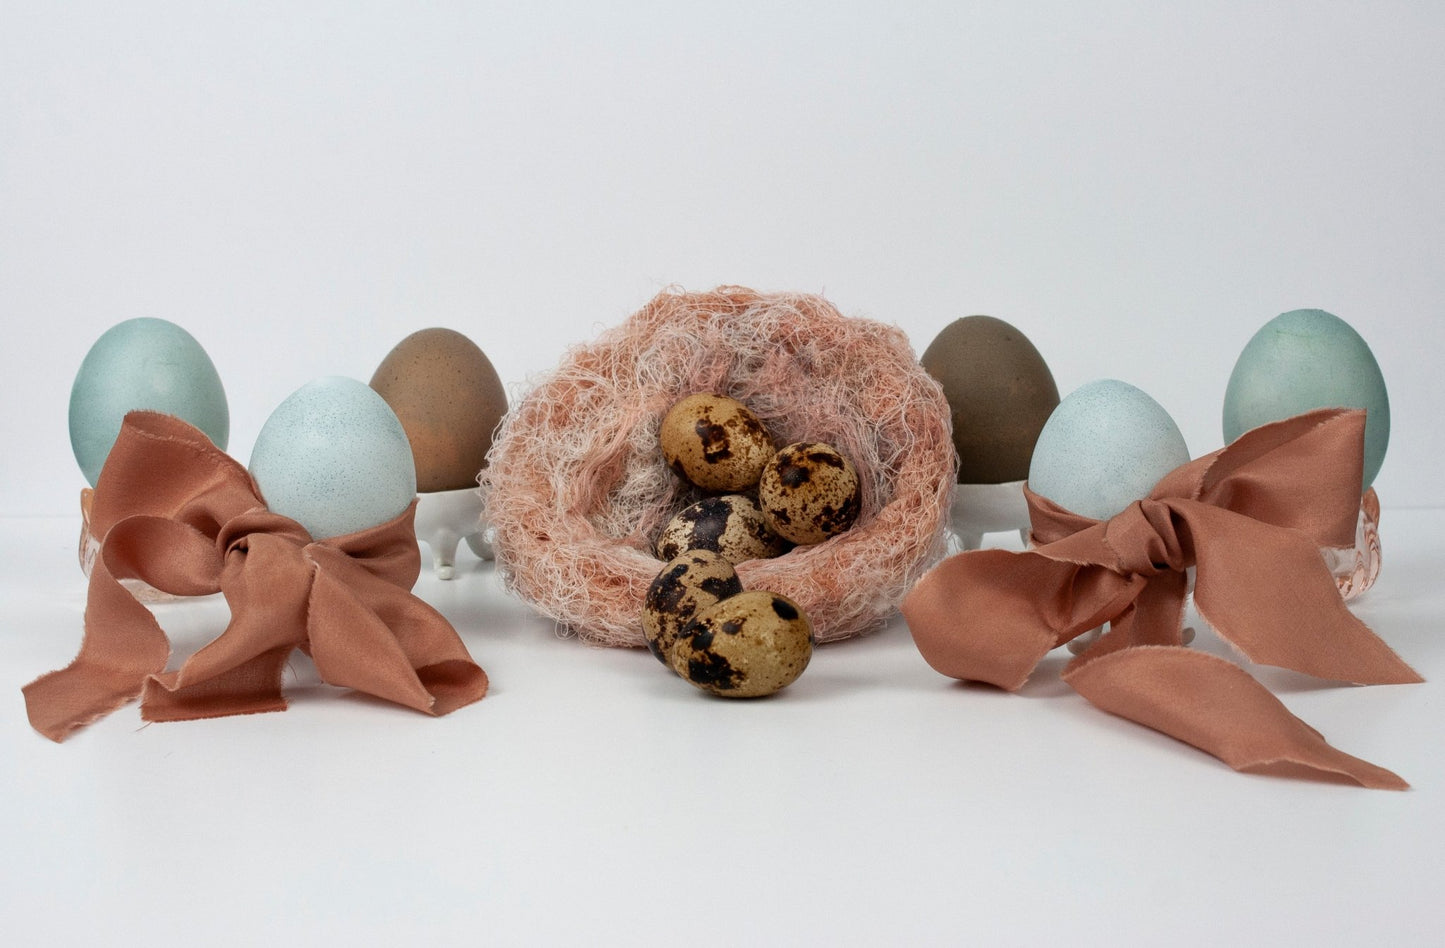
Handmade Silk Bird's Nest
Last but not least, is the silk bird's nest that I made. It was a fun little project. I am always looking for ways to use up the waste from making ribbons or repurpose materials. In the ribbon making process, I end up with piles of loose silk threads. I have been saving these threads for years, and each year my daughter and I scatter some around our yard, hoping to catch them in an abandoned nest at the end of the year. That would be so cool! But since we have established that I am not always patient, I decided to take matters into my own hands.
I used a small bowl in which to layer silk strings, which I lightly then sprayed lightly with spray adhesive and then repeated the process until I had a nest like structure.

I hope you have fun exploring your own ideas for dyeing and decorating Easter eggs!